Setting up a Remote IoT VPC SSH Raspberry Pi on AWS Free Tier is becoming increasingly popular among tech enthusiasts and professionals alike. With the growing demand for remote access and cloud-based solutions, this setup offers a cost-effective and scalable way to manage IoT devices. Whether you're a beginner or an experienced developer, understanding how this system works can significantly enhance your projects and workflows.
In today's interconnected world, the Internet of Things (IoT) plays a crucial role in modern technology. From smart homes to industrial automation, IoT devices are transforming the way we interact with technology. However, managing these devices remotely can be challenging without the right tools and infrastructure. This is where AWS Free Tier comes into play, offering a robust platform for setting up a secure Virtual Private Cloud (VPC) and enabling SSH access to your Raspberry Pi.
This article will guide you through the entire process, from understanding the basics of IoT and AWS to configuring your Raspberry Pi for remote access. By the end of this guide, you'll have a solid foundation to build your remote IoT projects and take advantage of the AWS Free Tier benefits.
Table of Contents:
- Introduction to Remote IoT VPC SSH Raspberry Pi
- Understanding AWS Free Tier and Its Benefits
- Setting Up Your Raspberry Pi
- Configuring a Virtual Private Cloud (VPC)
- Enabling SSH Access for Raspberry Pi
- Implementing Security Measures
- Integrating IoT Devices with AWS
- Common Issues and Troubleshooting
- Managing Costs on AWS Free Tier
- Conclusion and Next Steps
Introduction to Remote IoT VPC SSH Raspberry Pi
Remote IoT VPC SSH Raspberry Pi on AWS Free Tier is a powerful combination that allows you to manage IoT devices securely and efficiently. By leveraging AWS's cloud infrastructure, you can create a Virtual Private Cloud (VPC) to isolate your IoT devices and enable secure SSH access from anywhere in the world.
Why Choose AWS Free Tier for IoT Projects?
AWS Free Tier provides a cost-effective solution for developers and hobbyists who want to experiment with IoT projects without worrying about high costs. Some key benefits include:
- Free usage tier for 12 months
- Scalable resources for growing projects
- Comprehensive documentation and community support
Key Components of the Setup
This setup involves several key components:
- Raspberry Pi as the IoT gateway
- AWS VPC for network isolation
- SSH for secure remote access
- IoT devices integrated with AWS services
Understanding AWS Free Tier and Its Benefits
AWS Free Tier offers a range of services that are perfect for small-scale IoT projects. These services include EC2 instances, S3 storage, and Lambda functions, all of which can be used to build a robust IoT infrastructure.
Eligibility and Limits
To qualify for the AWS Free Tier, you need to sign up for a new AWS account. The free tier includes:
- 750 hours of EC2 Linux or Windows t2.micro instances per month
- 5 GB of S3 storage
- 1 million free requests for AWS Lambda
Advantages of AWS Free Tier
Some of the advantages of using AWS Free Tier for your IoT projects include:
- Cost savings during the development phase
- Access to a wide range of AWS services
- Easy scalability as your project grows
Setting Up Your Raspberry Pi
The Raspberry Pi serves as the gateway for your IoT devices. Proper setup is essential to ensure smooth operation and compatibility with AWS services.
Hardware Requirements
Before you begin, make sure you have the following hardware:
- Raspberry Pi 4 Model B
- MicroSD card (16GB or higher)
- Power supply
Software Installation
Install the latest version of Raspberry Pi OS on your microSD card. You can use the Raspberry Pi Imager tool to simplify the process. Once installed, configure the operating system to enable SSH and Wi-Fi connectivity.
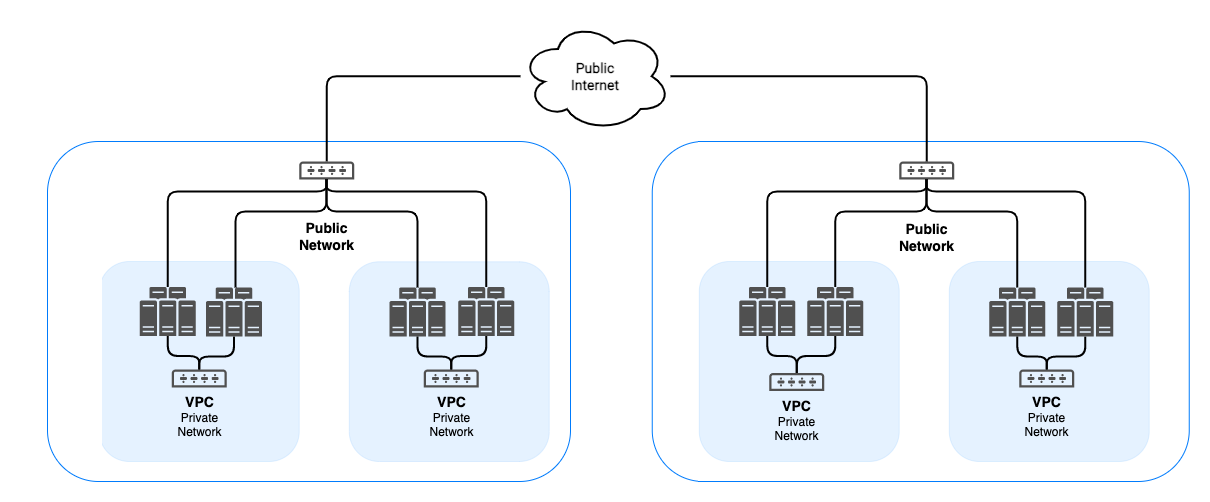
Configuring a Virtual Private Cloud (VPC)
A VPC is a virtual network dedicated to your AWS account, enabling you to launch resources in a defined network space. Configuring a VPC is crucial for isolating your IoT devices and ensuring secure communication.
Creating a VPC
Follow these steps to create a VPC:
- Log in to the AWS Management Console
- Navigate to the VPC Dashboard
- Click on "Create VPC" and configure the settings
Subnet Configuration
Once your VPC is created, configure subnets to define the IP address ranges for your resources. This ensures proper communication between your Raspberry Pi and IoT devices.
Enabling SSH Access for Raspberry Pi
SSH (Secure Shell) is a protocol that allows you to securely access your Raspberry Pi remotely. Enabling SSH access is a critical step in setting up your remote IoT infrastructure.
Generating SSH Keys
Generate SSH keys using the following command:
ssh-keygen -t rsa -b 4096 -C "your_email@example.com"
Configuring SSH on Raspberry Pi
Enable SSH on your Raspberry Pi by editing the sshd_config file and restarting the SSH service.
Implementing Security Measures
Security is paramount when managing IoT devices remotely. Implementing strong security measures can protect your infrastructure from unauthorized access.
Using Security Groups
Security groups act as virtual firewalls for your EC2 instances. Configure them to allow only necessary traffic and restrict access to specific IP addresses.
Regular Updates and Backups
Keep your Raspberry Pi and IoT devices up to date with the latest security patches. Regularly back up your data to prevent loss in case of failures.
Integrating IoT Devices with AWS
AWS IoT Core is a managed service that enables secure and bi-directional communication between IoT devices and the cloud. Integrating your IoT devices with AWS can enhance their functionality and provide valuable insights.
Setting Up AWS IoT Core
Follow these steps to set up AWS IoT Core:
- Create a thing in AWS IoT Core
- Provision certificates for secure communication
- Define rules and actions for data processing
Monitoring and Analytics
Use AWS IoT Analytics to collect, process, and analyze data from your IoT devices. This can help you make informed decisions and optimize your operations.
Common Issues and Troubleshooting
Even with careful planning, issues can arise during setup. Here are some common problems and their solutions:
SSH Connection Issues
If you're unable to establish an SSH connection, check the following:
- Firewall settings
- Security group rules
- Raspberry Pi network configuration
Device Connectivity Problems
Ensure your IoT devices are properly configured and connected to the network. Verify the firmware and settings to resolve connectivity issues.
Managing Costs on AWS Free Tier
While AWS Free Tier offers significant cost savings, it's essential to monitor your usage to avoid unexpected charges. Use the AWS Cost Explorer tool to track your resource consumption and stay within budget.
Optimizing Resource Usage
Optimize your EC2 instances and other resources by:
- Using the smallest instance type that meets your needs
- Automating resource shutdown during idle periods
- Implementing cost alerts and notifications
Conclusion and Next Steps
Setting up a Remote IoT VPC SSH Raspberry Pi on AWS Free Tier can significantly enhance your IoT projects by providing secure and scalable infrastructure. By following the steps outlined in this guide, you can create a robust system that meets your needs and stays within budget.
We encourage you to experiment with different configurations and explore the full potential of AWS services. Don't forget to share your experiences and insights in the comments section below. For more articles on IoT and cloud computing, explore our website and stay updated with the latest trends and technologies.