SSH Client on Raspberry Pi has become an essential tool for developers, hobbyists, and IT professionals alike. Whether you're configuring remote servers, automating tasks, or managing networks, understanding how to use SSH effectively can greatly enhance your productivity. In this guide, we will delve into everything you need to know about setting up and utilizing SSH Client on Raspberry Pi, ensuring you have the skills to manage your devices remotely with ease.
Raspberry Pi is a powerful and versatile single-board computer that offers endless possibilities for innovation. One of its most useful features is the ability to connect remotely using SSH (Secure Shell). SSH provides a secure way to access and control your Raspberry Pi from another computer, making it indispensable for managing headless setups or troubleshooting issues from afar.
This article is designed to provide a comprehensive overview of SSH Client on Raspberry Pi, covering everything from installation and configuration to advanced usage and troubleshooting tips. Whether you're a beginner just starting out or an experienced user looking to refine your skills, this guide will serve as a valuable resource for mastering SSH on Raspberry Pi.
Table of Contents
- Introduction to SSH Client on Raspberry Pi
- Installing SSH on Raspberry Pi
- Configuring SSH Client
- Connecting to SSH Client
- Securing Your SSH Connection
- Advanced Features of SSH
- Troubleshooting Common Issues
- Automating Tasks with SSH
- Best Practices for Using SSH
- Conclusion
Introduction to SSH Client on Raspberry Pi
SSH (Secure Shell) is a network protocol that enables secure communication between two devices over an unsecured network. On Raspberry Pi, SSH allows users to access the command-line interface remotely, making it possible to manage the device without needing physical access. This feature is particularly useful for headless setups where the Raspberry Pi is used without a monitor or keyboard.
Why Use SSH on Raspberry Pi?
There are several reasons why SSH is a popular choice for managing Raspberry Pi:
- Remote Access: SSH allows you to control your Raspberry Pi from anywhere in the world, provided you have an internet connection.
- Security: SSH encrypts all data transmitted between the client and server, ensuring that sensitive information remains protected.
- Versatility: SSH can be used for a wide range of tasks, from file transfers to remote command execution.
Installing SSH on Raspberry Pi
Installing SSH on Raspberry Pi is a straightforward process. By default, SSH is disabled in the latest versions of Raspberry Pi OS. To enable it, follow these steps:
- Boot your Raspberry Pi and log in to the operating system.
- Open the terminal and type the following command:
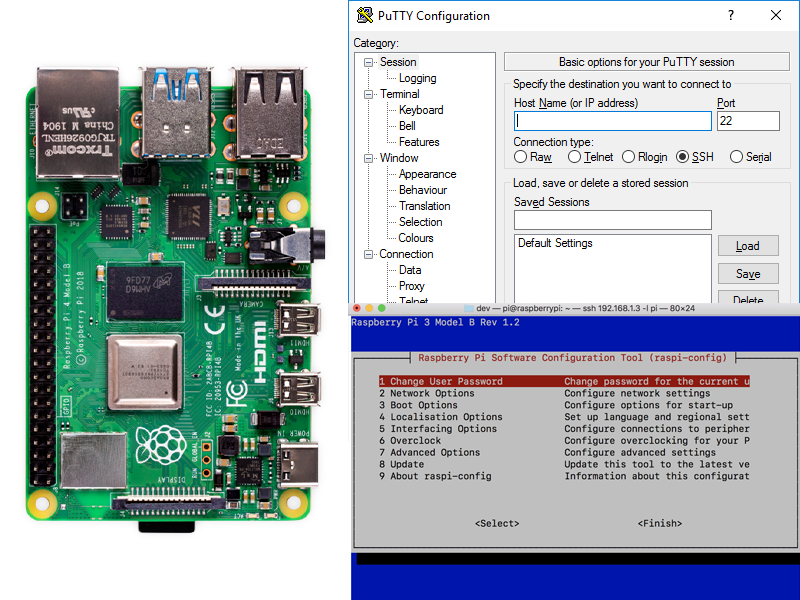
sudo raspi-config. - Select "Interfacing Options" and navigate to "SSH."
- Choose "Enable" and confirm your selection.
- Reboot your Raspberry Pi to apply the changes.
Alternative Method: Enabling SSH Without GUI
If you're setting up a headless Raspberry Pi, you can enable SSH by creating an empty file named "ssh" on the boot partition of the SD card. Simply insert the SD card into your computer, create the file, and reinsert it into the Raspberry Pi.
Configuring SSH Client
Once SSH is enabled, you can configure various settings to optimize its performance and security. The main configuration file for SSH is located at /etc/ssh/sshd_config. To edit this file, use the following command:
sudo nano /etc/ssh/sshd_config
Key Configuration Options
- Port Number: By default, SSH uses port 22. You can change this to a custom port for added security.
- Password Authentication: Disable password-based authentication to enhance security and rely solely on key-based authentication.
- Root Login: It's recommended to disable root login to prevent unauthorized access.
Connecting to SSH Client
Connecting to your Raspberry Pi via SSH requires a client application on your local machine. Popular SSH clients include:
- Terminal (Mac/Linux): Use the built-in terminal to connect with the command:
ssh pi@. - PuTTY (Windows): Download and install PuTTY, then enter the Raspberry Pi's IP address to establish a connection.
Locating Your Raspberry Pi's IP Address
To connect via SSH, you need to know the IP address of your Raspberry Pi. You can find this information by running the command: hostname -I in the terminal.
Securing Your SSH Connection
Security is paramount when using SSH, especially if your Raspberry Pi is connected to the internet. Here are some tips to secure your SSH connection:
- Use Strong Passwords: Ensure that your Raspberry Pi's login credentials are complex and unique.
- Enable Key-Based Authentication: Generate SSH keys on your local machine and add the public key to the Raspberry Pi's authorized_keys file.
- Install Fail2Ban: This tool can help protect your SSH server by blocking malicious login attempts.
Advanced Features of SSH
Beyond basic connectivity, SSH offers several advanced features that can enhance your workflow:
SSH Tunneling
SSH tunneling allows you to forward traffic from one network to another securely. This is particularly useful for accessing services behind firewalls or encrypting sensitive data.
File Transfer with SCP
Secure Copy Protocol (SCP) is a command-line utility that uses SSH to transfer files between systems. To copy a file from your local machine to Raspberry Pi, use the command: scp filename pi@.
Troubleshooting Common Issues
Even with careful setup, issues can arise when using SSH. Here are some common problems and their solutions:
- Connection Refused: Ensure that SSH is enabled and the Raspberry Pi is connected to the network.
- Permission Denied: Check your login credentials and verify that key-based authentication is properly configured.
- Timeout Errors: Verify the IP address and ensure there are no firewall restrictions blocking the connection.
Automating Tasks with SSH
SSH can be used to automate repetitive tasks, saving you time and effort. For example, you can set up scripts to automatically back up files, update software, or monitor system performance. To execute a command remotely, use the following syntax:
ssh pi@
Using SSH with Cron Jobs
Cron jobs allow you to schedule tasks to run at specific intervals. By combining SSH with cron, you can automate tasks across multiple devices effortlessly.
Best Practices for Using SSH
To get the most out of SSH on Raspberry Pi, follow these best practices:
- Regularly Update Your System: Keep your Raspberry Pi's software up to date to protect against vulnerabilities.
- Backup Configuration Files: Always back up important files before making changes to prevent data loss.
- Monitor Logs: Regularly check SSH logs for suspicious activity to maintain system security.
Conclusion
In conclusion, SSH Client on Raspberry Pi is a powerful tool that offers a secure and efficient way to manage your device remotely. By following the steps outlined in this guide, you can set up, configure, and utilize SSH to its full potential. Remember to prioritize security and best practices to ensure a smooth and reliable experience.
We encourage you to share your thoughts and experiences in the comments below. If you found this article helpful, consider sharing it with others who might benefit from it. For more tips and tutorials, explore our other articles on Raspberry Pi and related technologies.
Data Sources: